Design Automation tools have revolutionized the way complex machinery and systems are configured and customized for various applications. One of the most significant advancements in this domain is the user-friendliness of these tools, which has made them accessible to non-technical people. This user-friendliness is a game-changer, as it empowers individuals without extensive technical knowledge, we could say non engineering people, to configure and adapt intricate machinery to meet their specific needs and advance sales processes for many machineries manufacturing.
It’s important to emphasize that, in addition to the individual benefits for professionals, companies experience several advantages when implementing Design Automation, we have listed here many times. With the example of our 6 Value Areas.

However other benefits that’s this user-friendliness brings is lower training expenses as direct result of users requiring less technical expertise to operate the tools, ultimately leading to reduced labour costs and increased efficiency in projects. This, in turn, translates into significant cost savings, a big monster for small, medium and big companies that work with product development and customization in order execution phase.

One of the notable benefits that come to the forefront when implementing DA is the competitive advantage it offers. It promotes empowerment and innovation within the team, allowing non-technical personnel to take ownership of their projects. The tools – for example Parametric CAD Software’s, Configurators – have predefined parameters that prevent mistakes, resulting in a significant reduction in errors. User-friendly interfaces play a pivotal role in preventing configuration errors, enhancing product quality. Moreover, it fosters improved team connectivity and communication since the technical team and the non-technical team are aligned during the whole process.
To make it even more clear, here is an example of a configuration that a non-technical person could make using a Design Automation tool. Let’s consider a company that manufactures customized conveyor systems for various industries.
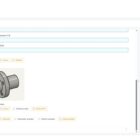
Normally, configuring a conveyor system involves specifying its length, width, speed, and the type of materials it will handle. A non-technical person could use a Design Automation tool to customize a conveyor system for a specific application. As a first step, the non-technical employee needs to have the master model where all information about that product is stored to start. Depending on the customer needs the type can change, being very important to have a master model for each one, these can be belt conveyors, roller conveyors, or chain conveyors. Each type has a user-friendly interface with a 3D model or even a realistic image and descriptions.
The second step would be the desired size and dimensions. Using simple input fields or interactive drag-and-drop features, the user can specify the wanted length, width, and height of the conveyor system. The tool provides real-time visual feedback on how these changes affect the design. Moving forward with the configuration, the third step would be the Material Handling. The user can indicate the type of materials the conveyor will handle. The automation tool may suggest appropriate material handling features like special belts or side guides based on the selected material.
The next step is Speed and Capacity. During the configuration, the non-technical person can specify the desired speed of the conveyor and the weight capacity it needs. The tool may provide recommendations or constraints based on the chosen conveyor type. Now comes a very important part of the configuration, the visualization. As the user makes selections, the tool provides a visual representation of the configured conveyor system within minutes. This helps non-technical users see how their choices impact the final design. And creates automatically 3D models and 2D drawings.
This kind of tools can also provide Pricing and Quotation. Once the configuration is completed, the tool can show an estimated price for the customized conveyor system and generate a quotation helping with faster communication with leads. The user can review, make adjustments, and proceed with the order in a fast pace, reducing the company lead time and possibly accelerating revenue.
In this video, you’ll witness the step-by-step setup of an elevator system, much like how we previously detailed the configuration of a conveyor system. Towards the video’s conclusion, you’ll also gain insights into the seamless integration of Design Automation tools with a Configure, Price, and Quote system. This integration streamlines the sales process, making it a must-use for non-technical people.